5 Movements for a Killer Workout That ONLY Require a Bench
What’s happening, Fringe Fam? We’re going to roll through 5 different bench-only exercises you can do if you’re sick of your barbell and bumper plates, dumbbells, or kettlebells (although we know that’s highly unlikely). These bench-only exercises can be paired together, performed on their own, in sets, or whatever floats your workout boat.
We have a huge selection of weight benches to choose from, so if you haven’t found your perfect fit, send us a message! We can help you find the one for you. We’ve got your back ;)
Step-Ups
These sneaky leg-burners are some of our favorites. Add some dumbbells or kettlebells by your sides or at your chest in front rack position and WHEWWW doggy, you’re asking for some fire in those legs.
When performing these, make sure the bulk of the work comes from the foot in front. Try to keep from jumping off of the back leg to make the work less on the front leg. It’s super easy to want to do that, but keeping these slower, more controlled, and focused on the front stepping leg will bring you the burn and results you’re looking for.
To start, both feet are flat on the ground and facing the bench. Choose your starting foot, and bring your knee up and the front foot to the top of the bench. Keep the back leg straight, and bring your chest slightly forward. Push through the front foot with your knee tracking over your ankle, straight forward, and use the back leg as little as possible to bring yourself to stand on the bench. To finish, both feet should be on the bench.
Next, you’ve got a choice: you can alternate your feet at the top OR the bottom of the rep. If you choose to alternate at the top, bring the first stepping foot down first, and back foot down second, and then repeat the movement with the previous back foot stepping first.
Any workout bench will work for this, but if you choose a flat/incline/decline bench, just make sure it’s completely flat and locked into place before starting your step-ups.
Tricep Dips
These are sure to put some fire in your arms and get you the ever-so-coveted tricep horseshoe. These can be done weighted, or unweighted. If you choose to weight these, place your weight of choice in the crook of your hips and on your quads so it stays put while you bust out some dips.
To start, your back should be to the bench. It usually works best to start sitting on top of the bench, with your hands flat on the bench next to you. From there, keep your weight in your hands and walk your feet out a bit, bring your bum off of the bench and out in front. Your legs should be mostly straight with a slight bend out in front of you, and your heels are the point of contact with the floor.
In this starting position, the top half of your body should be vertical, so if you feel like you’re at any angle, try bringing your feet in a touch or out a touch if you feel cramped toward the bench.
Next, bring your bum toward the floor, bending your elbows and making sure they track straight back, not in toward your body or away from your body. Imagine you’ve got lasers coming out of your elbows and you’re trying to shoot them straight back behind you. (Just imagine it, okay?)
Bring yourself as far down as it takes for you to feel a teeny tiny little stretch in your chest, and press back up. Don’t be afraid to bend your legs a little bit more as you get closer to the floor, and straighten them out as you come back up to the top of the rep.
Add these sneaky stingers into your workouts and you’ll see that tricep horseshoe soon enough.
Bulgarian Split Squats
These suckers are TOUGH, so keep that in mind as you attempt. Even unweighted, these are tricky because they require single leg strength and a ton of balance, and adding weight to these makes them all the more difficult.
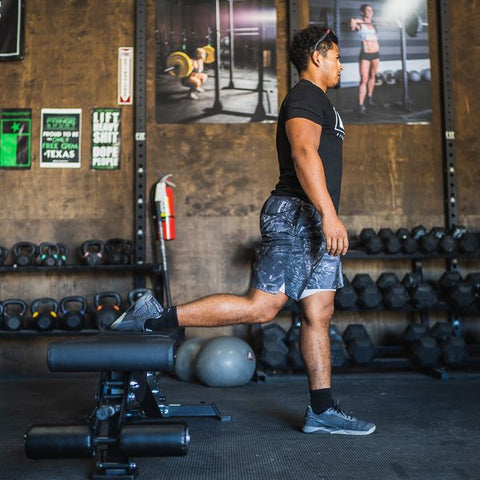
This movement is going to be performed again facing away from the bench. The set-up is tricky, but after some practice and trial and error you’ll find the best set-up for you. Like Travon in the photo above, one foot should be in front on the floor, and the other foot should be top down on the bench behind you. In this starting, standing position, the back bent leg should be at about a 90 degree bend or so (bigger is fine if that is more comfortable for you), with your knee down toward the floor.
To begin, find your balance, and bend your front leg. Depending on the height of your bench, your back knee might come to the floor, but that doesn’t necessarily mean it should be the goal for your reps if that puts too much strain on your hamstring and glute in the front leg. If your knee doesn’t touch the ground, don’t force it, and come down as far as it takes to feel a teeny tiny stretch in the front leg glute. Make sure your weight is in the front leg, and push that front leg straight again. Repeat!!
These can be weighted like goblet squats, with weight in front rack position for maximum brutality, or with weight down at your sides. Get ready for a wild ride and some sore legs!
Incline or Decline Push-Ups
Benches are so great because they allow you to really customize your workout. If you need a substitution for something, benches have got your back. Want to make something harder? A bench can do that too. That’s the case with push-ups, and while they can be difficult on their own, a bench can make it easier to work on progressing in strength and also more difficult if you need or want the challenge.
Incline push-ups are a perfect way to work on your push-up strength. Adding an incline to your push-up takes some of the difficulty away because you’re not performing them on a flat plane. Decline push-ups add more difficulty and more of a challenge for even more strength once you’ve mastered the regular push-up.
Incline push-ups are performed just like a regular push-up, in a high plank with your core as tight as can be, and your body in a straight line from the back of your head to your heels. Instead of placing your hands on the floor, they’ll go on the edge of your bench!
In a high plank position with all the marks above checked off, you’ll want to bend your elbows at about a 45 degree angle from your body. As you come down to the bench, make contact with your chest, and your thumbs should be near if not in your armpits. Keeping your back as flat as possible and core tight, press yourself back up using just your arms. Your legs should stay straight throughout the entire movement. You’ll notice a level of difficulty that’s hard to achieve on the floor, even when opting for a knee push-up because even then, you’re still on a flat plane. The incline takes some of the difficulty out of it and will allow for strength and confidence in the push-up.
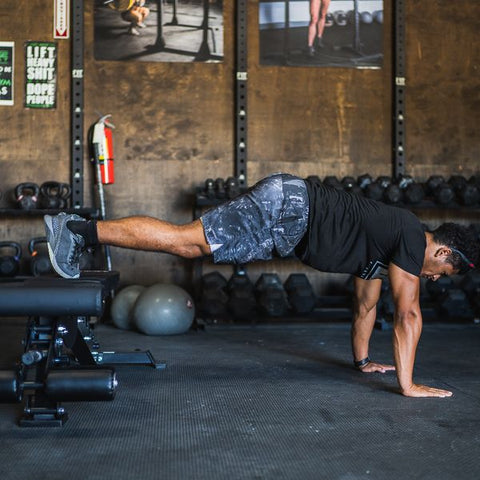
The decline push-up is a little different. Instead of placing your hands on the bench, they’ll go on the floor, and your feet will rest on the bench for this movement. The same marks apply: back flat, core tight, legs straight, and your hands should sit under your shoulders.
To do a decline push-up, get your starting position set, and bend your elbows at the same 45 degree angle you would for a regular push-up. Bring your chest as close to the floor as possible, and push back up keeping your marks checked. Lock out your elbows at the top, and repeat.
Boom, push-up modification and progression.
Dragon Flag
This one is a little out there, but only because it’s likely not something you see everyday in your training. A dragon flag is a core SCORCHER and takes a little practice to get right. These are essentially hollow hold body-lowers while lying on the bench. Don’t worry… we’ll explain!
To do these, you’ll start lying on the bench with your hands up behind your head, holding onto the bench there. To get yourself in the starting position, you’ll want to bring your legs up over your head and point your legs and toes toward the ceiling. However you have to do that is fine, and it usually works best to bring your legs to your chest first and then push them up toward the sky.
The real grinder starts here, at the top. From the very beginning, you’ll want to position yourself in a hollow hold. Think of a banana, and how they generally have a slight curve to them. Not a ton, not an “L,” and you’re also not in a totally straight line from chest to toes. We want a little curve at your hips so we can keep the entirety of your ab muscles engaged throughout the movement.
With your toes up, legs straight, slight curve in your hips to make a hollow position, start to bring your feet down toward the bench. This is HARD, so keep that in mind. Fight for the hollow position all the way down, and avoid breaking at the hips into an “L” as best you can. Once you reach the bench, you can relax. Then, repeat and bring your toes back up to the ceiling.
This should be done very slowly, with control and intent to get your core on fire. You’re a dragon flag, and the dragon is breathing fire straight to your abs.
If you have questions about these movements, let us know! Any and all of our benches will work for these movements. You can make a tough as heck workout with these 5 movements, and there’s no weights necessary. If you lack a bench, you can snag one now while you can get a deal! It’s also possible to utilize a bench of some other kind, like from your dining table if you’ve got it, or a park bench if you’re in the great outdoors.
Let us know what you think of these bench-only movements and if we can help make them more clear for you, or help you put together a killer workout. Don’t forget to complete your garage gym set-up with a bench for huge bench gains!
As always, lift heavy, lift happy :)


Leave a comment